|
|
ForumsSega Master System / Mark III / Game GearSG-1000 / SC-3000 / SF-7000 / OMV |
Home - Forums - Games - Scans - Maps - Cheats - Credits Music - Videos - Development - Hacks - Translations - Homebrew |
View topic - How to make new Sega Master System cartridge cases
 |
| Author | Message |
|---|---|
|
How to make new Sega Master System cartridge cases
Last edited by dragonfeet on Sat May 03, 2014 12:40 pm; edited 1 time in total |
|
iframe type="text/html" width="640" height="360" src="https://www.youtube.com/embed/FQ1A7ZjTsx8" frameborder="0">
OOMOO 30: http://www.smooth-on.com/Silicone-Rubber-an/c2_1113_1136/index.html Smooth-Cast 300: http://www.smooth-on.com/Urethane-Plastic-a/c5_1120_1209/index.html Release Agent: http://www.smooth-on.com/Release-Agents-and/c9_1123_1226/index.html Sealer: http://www.smooth-on.com/Release-Agents-and/c9_1124_1172/index.html |
|
|
|
|
|
|
|
=================
1 - Gather Equipment ================= You'll need these things before you get started. * OOMOO 30 (2 trial size or 1 gallon unit) Other products work too, but OOMOO is what I used. * Smooth-Cast 300 (1 trial size or 1 gallon unit) * Ease Release 200 * SuperSeal liquid sealer * 1 Sega Master System cartridge case (both sides) * Hot glue gun * Latex gloves * Paint stirrers (wooden sticks) * 2 large plastic cups * 2 small boxes Use a shoe box, snack cake box, or some other paper box large enough to fit two sides of cartridge case * A roll of duct tape * A drinking straw * Small paper or plastic drinking cups * Exact-o knife * Nuts, bolts, acorns, dice or other small items to act as a key * A well ventilated area to work in * A room-temperature environment (product does not work when it's too cold) * You're probably going to need some newspaper or a plastic tarp |
|
|
|
|
|
|
|
=====================
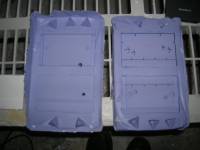
2 - Make the bottom side ===================== 1) Unscrew the SMS cartridge to separate both sides. 2) Place the circuit board inside an anti-static bag. 3) Plug in the hot glue gun. 4) Glue the cartridge sides face down in the paper box. Keep the two sides about 1/2 inch from each other. Also make sure cartridge sides are at least 1/2 inch from sides of box. 5) Glue the dice around the cartridges. Keep dice about 1/2 inch from cartridge. <see> 6) Create a water-tight seal around the box (wrap the corners and edges with duct tape several times). 7) Spray the inside of the box, cartridge and dice with SuperSeal. Hold spray bottle about a foot away and spray a light mist over everything. 8) Wait about an hour. 9) Put on your rubber gloves. 10) Spray EaseRelease over everything in box. 11) Mix OOMOO according to instructions. 12) Pour OOMOO mixture into one corner, letting it slowly fill the box. 13) Allow mold to sit for 12 hours (it cures in 6 hours, but I usually let it go overnight). 14) Tear box off of finished mold. 15) Carefully remove dice from mold. Do NOT remove cartridge just yet. 16) Remove all hot glue from cartridges. 17) Use knife to trim unwanted flaps from mold. Congrats! The top half of the mold is complete! 
|
|
|
|
|
|
|
|
===================
3 - Make the top side =================== 18) Put on your rubber gloves again. 19) Turn mold so that cartridge face is facing up. 20) Using the sides of the second box and duct tape, create walls to hold the top part of the mold. 21) Cut the drinking straw in half. 22) Use hot glue or clay to stick drinking straw to each half of the cartridge. When using the mold, these holes are used to pour the material in. 23) Spray EaseRelease over bottom half of mold. 24) Mix OOMOO according to instructions. 25) Pour OOMOO mixture into one corner, letting it slowly fill the box. 26) Allow mold to sit for 12 hours (it cures in 6 hours, but I usually let it go overnight). 27) Tear box off of finished mold. 28) Separate the two mold halves. 29) Remove the cartridges from the mold. Now you have a two sided mold! Next is the final step. Making new cartridges. 
|
|
|
|
|
|
|
|
===========================
4 - Make a new cartridge =========================== 30) Get those rubber gloves on. You do NOT want Smooth-Cast to dry on your hands! 31) Spray both sides of the mold with EaseRelease. 32) Put the mold together. 33) Place a funnel in both holes. 34) Mix Smooth-Cast according to instructions. *** Warning! This stuff solidifies after 2 minutes! Mix and pour quickly! 35) Quickly pour the Smooth cast into both holes until the mold is filled. 36) Remove the funnels. 37) Wait 10 minutes (cures in 5 minutes, But I always give it some extra time). 38) Carefully peal the mold apart. 39) Carefully peal the finished product from the mold. 40) Repeat until the desired number of cartridge cases are completed. The molds are flexible, but don't bend them too much. They can crack, and it's not pleasant. :( Also, be liberal with the EaseRelease. You don't want to break the mold because part of it was permanently attached to the casting. Good luck! 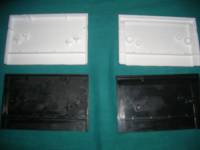
|
|
|
|
|
|
|
|
Very cool!
This chap sucessfully made a SC3000 cart case using a similar method too btw (check his youtube channel for more info) - \o_ |
|
|
|
|
|
|
|
Look nice !
I've planned to use nearly the same products ^^ I will use Mold Max® 30 to make the molds and Smooth Cast 300 (pure white) and 320 (with pigments) to make few tests. Can you post some others pictures of the final cartridge, to see some fine details ? |
|
|
|
|
|
|
I know. I copied the SC3000 methods when making this cart. :) |
|
|
|
|
|
|
| Very good looking indeed. I like how sharp the edges are. What improvements do you have to make? Think you might do some replacements buttons or anything sometime? Custom colors, etc. :) | |
|
|
|
|
|
Improvements? The carts come out a little too thick and need to be sanded so they slide in and out of the system easily. Also, sometimes I get air bubbles in the cart, so I wind up discarding some of what I make... But that's due to my lack of experience in mold making. Other people online are more careful, and have avoided these problems. |
|
|
|
|
|
|
I love the creative use of the D4

|
|
|
|
|
|
|
| I'm happy to see instructions for this. I recently 3D printed my own custom SMS cart (pictures to come) and was planning to try the Smooth-On solution to cast multiple carts. | |
|
|
|
|
|
What is you cost per cartridge case with the 3-D printing? I'm at around $5 per cart including cost to make the initial mold, or a little less than $2 per cart excluding initial mold costs. |
|
|
|
|
|
|
I haven't ordered any smooth-on products yet. I thus far had two high-quality 3D-prints made of my custom SMS shells with http://www.anubis3d.com/, it's a pretty expensive service but these are my templates and I figured the price was worth it. |
|
|
|
|
|
|
|
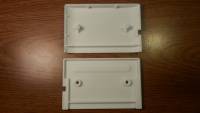
These are my 3D printed templates; printed by http://www.anubis3d.com.
I've made a Genesis and SMS shell and embossed my "db" logo in both, though that detail is kinda hard to see in these pictures. 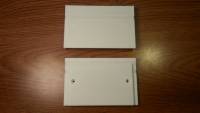

|
|
|
|
|
|
|
| I... wouldn't mind if you kept them white. It reminds me of the Mark III cartridges. | |
|
|
|
|
|
| how much did you spend? | |
|
|
|
|
|
|
Very nice job guys :)
I did some molds a couple of years back for the Sega SC-3000 Multicart project. This is the how-to page I did documenting my progress on that (includes links to all the YouTube vids I took along the way) http://sc3000-multicart.com/sc3000-cart-case.htm Dragonfeet - are there any particular places you are having trouble with air holes? Does the SmoothOn get up into all the high points in the mold?. With the design I used, I put sprue holes on several of the high points, and with the squash mold design the thin vertical edges of the cart tend to fill out pretty well. My air bubbles tend to form on the flat portions of the cases. But I don't throw them out. I just wait until I have done about half a dozen cases then I put some insulation tape on the back of the air bubbles and spot fill the bigger holes using a disposable pipette / dropper. That works pretty well. db-electronics - nice work on the 3D printed cases. Great for originals for making molds from, but unfortunately pretty expensive and slow to make lots of high quality cases that way. You can also use the trick I did where you just 3D print your own small logo then glue it onto the back of the original case you use to make the molds. I did a nice little 3D SC-3000 Survivors logo for that, and got it printed for a few dollars using an online service. Cost wise it is pretty cheap if you live in the USA. I would recommend using Smooth-On products. Pretty expensive for me here in New Zealand unfortunately :) If you live in Australia, try the Barnes products (PinkySil / EasyCast). Good luck to anyone else who wants to try. I'm not an expert, but I think the following tips are good advice for anyone else trying it. 1. Watch lots of different YouTube videos from different people until you get a good feel for what you are trying to achieve. 2. Spend a while planning out your mold design before you start. Work out in your head how the mold is going to operate. And figure out where to put your sprue holes. They can be used to fill the mold and to let air out. But it is hard to put them in after the mold has been poured because you can't easily drill or cut a neat hole in the silicon. So a bit of planning before you start is important. 3. If you are lucky enough to live near a good hobby shop where you can chat with someone with experience, then do it. I used a squash mold design, which is a different technique to what dragonfeet did. Squash molds can work well for thin walled items cartridge cases (the thinnest bits are probably only about 0.75mm thick, and most of the case is only about 1mm to 1.8mm thick). But I have also seen pictures of the pour mold design for cart cases which work well. 4. Do some small scale tests first to get a feel for how both the molding and casting products perform. 5. You should wear gloves when handling the molding products. Try not to inhale the fumes / have good ventilation. Keep the products away from kids. And be VERY careful not to get any in your eyes. The products are fairly safe in small quantities, but respect them because they can do some damage to you or your kids if you aren't careful. 6. Choose the right products to start with. Both Barnes and SmoothOn have some very good products. I used Barnes PinkySil for my molds. That was great - durable and flexible. http://www.barnes.com.au/ http://www.barnes.com.au/addition-curing-silicone/pinkysil-200g-1591 There are MoldMax or MoldStar equivalents available from SmoothOn that should work just as well. http://www.smooth-on.com/Silicone-Rubber-an/c2/index.html I have used both Barnes EasyCast and SmoothCast 320 for the actual castings. They are both very good. The SmoothCast 320 might take tints a little better. Both are very thin (they run almost like water), which is what you need to get into all the thin parts of the mold. http://www.smooth-on.com/Urethane-Plastic-a/c5_1120/index.html http://www.barnes.com.au/polyurethane/easycast-342kg-1306 The SmoothOn So-Strong dyes are absolutely brilliant - much better than the Barnes pigment based dyes. I found that the Barnes pigment dyes were hard to mix and made the mixture much thicker so it was harder to evenly fill the mold. The So-Strong dyes / tints come in little dropper bottles so you can just make up a small amount quickly and easily. You can also use them with casting products from other manufacturers - they seem to work fine with EasyCast for instance. http://www.smooth-on.com/index.php?cPath=1202 Cheers |
|
|
|
|
|
|
I did pay quite a bit for these SLS prints - the quality however is amazing! I really needed an MD case as well which has the Japan notch. The company where I printed, Anubis3D, is Canadian and I like to support local business even if I end up paying a bit more for their services. If I had any experience with mechanical CAD software I would definitely try the trick you are suggesting. I'm unfortunately not very well versed in anything other than electrical engineering. The 3D models for the SMS case come from a thread on this forum and the MD cases were modelled by a friend of mine. |
|
|
|
|
|
|
Does the master system have the big raised rectangled below the label, like the one in the Sonic 2 Cartdrige on the picture in this image? http://www.powersonic.com.br/stuff/scans/capas/cart_sonic2ms.jpg By the picture, i can't tell id there isn't or i just can't see. Well, if isn't there and if you want to put, you can by placing a label when doing the mold, like with the BJB logo in this video: http://www.youtube.com/watch?v=iRj6xzNx7P4 |
|
|
|
|
|
|
| No I don't have the big raised rectangle on my template. | |
|
|
|
|
|
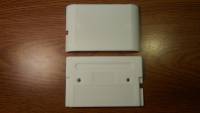
Yes, it is harder to do a full case design yourself, but you can learn if you want to. And it is easy to learn how to do something like a logo if you already have a design to trace. Took me a couple of days of playing around in my spare time. Just download some free CAD software and look at their tutorials. From memory I ended up using Autodesk 123D. They of course hope that you use their own printing service, but you can export an industry standard model to send to another online 3D printing service. And they have good example how-to videos to get you started. http://www.123dapp.com/ 3D Logos suitable for gluing onto a master cartridge (which you then take a mold of) are easy to make. Just import a PNG of your existing logo, then use the polygon shape tools to trace over the top. You then extrude the logo shape by pulling or pushing it to give it some thickness. You can add / subtract shapes to give yourself the required depth. A bit fiddly at first, but pretty easy once you get the hang of it. Here's one of my early sample cases showing how the logo looks after coming out of the mold - that blue case is a casting taken from the mold of a Sega original case with a 3D logo glued on the back of it. So now all the castings have a logo. 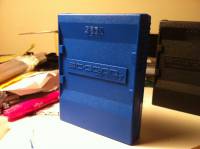
|
|
|
|
|
|
|
Air bubbles are a problem. Sometimes I can dribble a little extra material in to fill the holes, just like you do with the dropper. I've tried slowly flipping the mold (with the holes plugged of course), which helps some. Maybe I just need more air holes. |
|
|
|
|
|
|
You should be able to improve things with a little practice and maybe some mods to the mold. Try this - use your mold like a squash mold. Fill the bottom half of the mold (the half WITHOUT the sprue holes 2/3 with SmoothCast. Then squish the top half of the mold onto it. You will find that lots SmoothCast splurges out the sides as well as out the sprue holes. That is what you want. Once it sets it all comes off the mold pretty easily, so don't worry about the mess. But put newspaper down because it will go everywhere :) And periodically using mold release spray is a good idea too. As that Smoothcast is splurging out the sides it will take a lot of air with it. You waste a bit more Smoothcast with this technique. The idea is to have say 50% more than you need to fill the mold and let it squish out as you join the mold halves. So make up *lots* when you first try out this technique. Try that a couple of times and see if it is an improvement to your original technique of assembling the mold first and pouring the Smoothcast into the sprue holes. If this approach works for you then you gradually learn exactly how much you need and you can cut down the excess wastage. I've unfortunately forgotten my exact magic numbers as I have not made any for a few months. But I think I got it down to something like mixing up 70ml of SmoothCast / EasyCast where the parts only require about 50ml to 55ml. Something like that. But start off with heaps of extra and work down. Choosing an appropriate mold design for the particular shape of the part you are trying to copy before you start makes a huge difference. In general, air likes to stay in little pockets, it congregates into bubbles in the mold, and it gets stuck in the high points of the mold. The only way to remove it is to have sufficient space for it to escape. That is tricky on a thin piece like a cartridge case. eg. imagine you were casting a spherical ball. You would only need a single sprue hole and all the air would easily escape through that one hole. But the cart case has all those inconvenient little channels around 1.5mm wide, and the air bubbles won't all easily make it to the one or two holes you have, especially if there are high points where the air bubbles are hiding. By comparison, I went with 5 small sprue holes on the high points of the part rather than one big one. I don't know for sure if that was a 'better' idea, but it felt like the right choice at the time and it works reasonably well. If your mold is sufficiently hard, and if you are getting air bubbles in a consistent place you might be able to drill some more sprue holes. But my Pinkysil molds are flexible and durable. You can poke a drill through it, but no material gets removed and the hole closes up as soon as you remove the drill bit. So it is difficult to modify. Some other thoughts: 1. Practice. You will get better at it after the first 10 or so cases and you learn how your mold works. 2. Learn to let it go. Decide how bad the air bubbles have to be before the case is no good to you. That is hard to do. You have spent ages working on this and you are hoping for a perfect pour every time. But that isn't possible on a thin walled piece like this. The end users are not going to hold up your case in front of their nose and inspect it for imperfections the way that you do :) 3. Work on your repair technique. If the holes are mostly on the flat parts of the case and no more than say 2mm to 4mm wide then you can do a pretty good repair of the bigger holes as I described. The key is using insulation tape on the exterior / back of the case to stop the SmoothCast leaking through the hole and making a mess before it sets. It is harder to fix big holes on the vertical edges. 4. Careful colour choice - dark colors don't show the imperfections as badly as light colours. A hole on a black cart blends in, but a hole on a light cart stands out. 5. You could try a compression chamber. That compresses the air bubbles to make them smaller. I played around with that but decided it was too much hassle. 6. Use mold release spray regularly (perhaps after every 2nd or 3rd casting). Just use a thin layer though. And periodically wash your mold with soapy water too (and let it dry really well before use). The air bubbles seem to stick in the thin parts of the mold a bit more if the mold is dirty. Good luck :) |
|
|
|
|