|
|
ForumsSega Master System / Mark III / Game GearSG-1000 / SC-3000 / SF-7000 / OMV |
Home - Forums - Games - Scans - Maps - Cheats - Credits Music - Videos - Development - Hacks - Translations - Homebrew |
View topic - "Soggy" SG-1000 clone
 |
| Author | Message |
|---|---|
|
"Soggy" SG-1000 clone
Last edited by leadedsolder on Tue Apr 18, 2023 9:07 pm; edited 1 time in total |
|
Hello all,
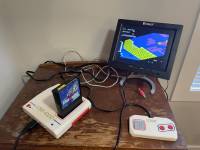
Over the last couple of months, I've been working on "Soggy-1000," my own SG-1000 clone based on the excellent Enri schematics. I've posted a little bit about it before, but haven't made a thread yet. 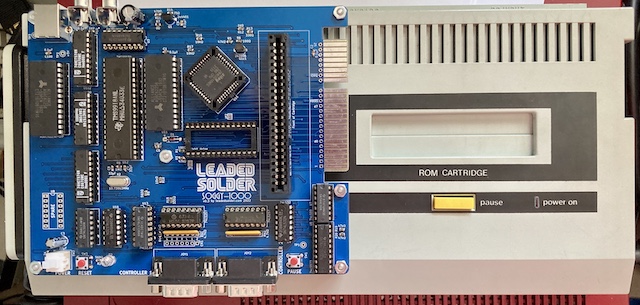
Here are the posts so far on my own blog:
Some other features have been added to the system that a real SG-1000 doesn't have:
My goal is to eventually use it to replace my SC-3000, whose keyboard is starting to fall apart. I would like to also develop a Forth interpreter for the system, maybe one that takes advantage of the onboard ROM, and use it to make new software. The board is all open-source (I haven't decided on license yet, but my previous ColecoVision clone was licensed under Creative Commons Attribution-NonCommercial 4.0.) Here is the link to the GitHub repository and project page for the Soggy-1000. Future goals:
There are still some teething pains to work out (one of my boards developed a bizarre sound problem in Flicky after sitting for a few months,) but I'm really happy with how it's turned out so far. I will try to make little posts here as I make updates and do tests, and answer any questions that the posters here may have. Thank you for reading all this! |
|
|
|
|
|
|
|
What a neat project it is turning out!
Doing a repro sk-1100 is on by backlist as well! I wanted to do the same thing, a mechanical keyboard with the exact SC3000-H layout. Unfortunately, I do not have a SC3000-H. I already verified enri's schematic for the sk-1100 and it works. It would be cool to find a scanner big enough to scan it the pcb of the SC3000-H, and get the correct spacing for the arrow keys, etc. As for the keycaps, I found the same thing. There are many "fake japanese" keycaps, which have the hiragana just for looks, but the chars over the numbers are the ones of the english keyboard, and not the ones of the japanese keyboards, which the SC-3000* uses. You need to search for ”日本語配列 キーキャップ” and you get things like https://search.rakuten.co.jp/search/mall/%E6%97%A5%E6%9C%AC%E8%AA%9E+%E3%82%AD%E... but clearly there is much less choice than the ton of cool aliexpress m keycap sets. An option may be going with something like https://www.aliexpress.com/item/1005004761931363.html and labeling each key on the side with a label printer with transparent background (like this https://www.kingjim.co.jp/english/products/tepra/tepra-pro/ ) This would also allow to add the sega custom chars. I found the original stickers for the export version https://segaretro.org/images/b/b2/John_Sands_SC-3000H_AU_Hard_Key_Stickers.jpg It would be nice to find the japanese version of these stickers (They seem to exist because I saw them stuck on SC-3000 pictures found on the net). |
|
|
|
|
|
|
|
That’s a really good tip, thank you! I had sort of assumed that Japanese and Western keycap sets all flowed through the magical market of AliExpress. I’ll see if I can find something.
The wider CTRL key (which is in the correct place) is also an obstacle, but I am planning on breaking with tradition and putting the backspace key in a more “IBM PC” location, because the existing placement annoys me. Thank you again for all your help so far! Today I was debugging the page switching logic. 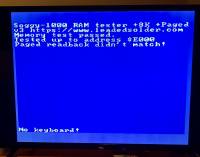
|
|
|
|
|
|
|
|
Actually I am an emacs user, and I always map capslock to an additional control on all my pcs. Once you get used to, you can't go back :)
I guess the logic is on the cart, isn't it? |
|
|
|
|
|
|
The page switching on the clone so far is an extra write to a latch at $10 which sets the top two address lines of the RAM; the idea is that the bottom 8k of RAM will be fixed (same as original) and the top 8k can be switched between the remaining 24k of RAM in the 62256. It’s all onboard, but I don’t think it should cause any compatibility issues unless some games are trying to use all the way up to $ffff and then reading them back at an earlier location. So far it isn’t working; I think I have a timing issue such that the latch is trying to set the address lines after the RAM has already received OE. Despite being a vi user, I agree that the right place for CTRL is left of A. So much more comfortable - less RSI. |
|
|
|
|
|
|
| Great project @leadedsolder, looks really neat! | |
|
|
|
|
|
|
This might be a dumb question but.. any potential for adding the YM2413 chip into the mix? Like the Japanese Mk-2000 SMS? This would make a rather interesting compatibility dynamic since theoretically any games written for the Soggy-1000 could also work on a Mk-2000 since it had an integrated FM and could use both the extra YM chip and default SN chip simultaneously.
Aside from homebrew, there's a lot of chiptune potential for this... As awesome as the Japanese Mk-2000 is, obtaining vintage hardware for testing music on can be rather difficult lol. |
|
|
|
|
|
|
That’s a really good question. I don’t have any 2413s lying around (only YM2203,) but I suspect it would be possible to carve out a spot for it in the I/O map. In theory you could even do it on a cartridge, now that IOR and IOW are broken out to the cartridge slot for SF-7000 compatibility, although I’d have to look at what specific I/O address it uses to figure out if I can easily add a decode. Sega is tricky sometimes, especially when it comes to the Mark III pinouts… |
|
|
|
|
|
|
|
The hardware in the FM adapter is quite general - see Enri's reverse-engineered schematic here: https://web.archive.org/web/20140505182013if_/http://www43.tok2.com/home/cmpslv/...
but the Sega software that uses the FM module expects to find it only at $F0, $F1, and the enable register at $F2. |
|
|
|
|
|
|
| Nice work! | |
|
|
|
|
|
|
It could be nice to have an 8910 PSG (like MSX and Colecovision + SGM) as well. Unluckly original SF-7000 uses entire E0-FF I/O ports range so you need to move it elsewhere. If you need I have an original SF-7000 to test it on as well as an SG-1000 II.
S.
|
|
|
|
|
|
|
| It looks awesome, I can't imagine how the future console case could look like. | |
|
|
|
|
|
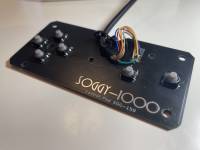
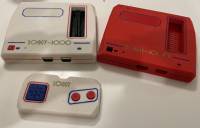
Fortunately, you don't have to. leadedsolder, accursed bastard that he is, gave me a board to build, which meant I naturally had to build it. Then I looked at it and thought "this is just a bare PCB with crap plugged into it," and when he offered me some rubber feet to stick on the bottom I just couldn't handle it. Also my SJ-150 and my SJ-125 both kind of suck, and they're too small for normal white person hands anyways, so I thought "why not ruin my life over this?" My build, the white one, is an earlier revision without a lot of internal structural bracing I added later, and without the nice port indicators on the back you can see on the red one. (The red one is leadedsolder's, I'll leave showing that one off to him.) I stole the rubber domed tactile switched the controller is using from leadedsolder's build of a homebrew calculator because I was too lazy to either TPU print or mold rubber domes for the controller, and they work [i]remarkably[i] well here. The button and D-pad feel is great -- very responsive. (And of course, the controller itself works perfectly on a Master System or Mark III, if anyone feels like they need a new-build controller. I could pretty trivially design a more conventional-looking shell, too.) 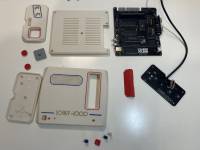

|
|
|
|
|
|
|
|
Wow it looks so sick!
are the buttons non-clicky? |
|
|
|
|
|
|
Thanks! Yes, the rubber dome buttons mean that they don't have a distinct click to them. They're firm, which I actually like, especially since 3D printed parts can be a little sloppy depending on the print tolerances, but they feel like game controller buttons, not clicky tactile switches. |
|
|
|
|
|
|
|
I still have to put my board into the cool new red shell and build the controller (thank you again keegs!!! It rules.)
I forgot to update this thread with the Part 3 Soggy-1000 post, where I implement page switching to unlock the full 32k of RAM, fix some bugs, and add an onboard boot-ROM socket, which will boot if the cartridge isn't installed. I am working on testing the version 4 board, which is mostly just bug fixes, cost reduction (using a DIP Z80 instead of a PLCC one saves nearly $14!) and compatibility (adding support for Genesis 3-button pads.) Thanks for all the positive reception for this project so far. |
|
|
|
|
|
|
|
Really awesome work @leadedsolder and @keegs both!
So the case is all 3d printed apart from the scavenged switches?
Would like to find out more - I'm still on the lookout for new controller options. Are they playable with just the PCBs or is the case needed? |
|
|
|
|
|
|
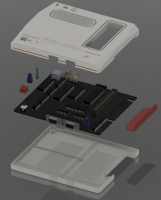
The case is all 3D-printed. Nothing scavenged, this can be built completely from scratch.
This is actually the reason I went with the pushbuttons with the domes built-in; you're not beholden to using a case that fits some specific rubber pad (like the stock SMS buttons or D-pad). You could definitely use the controller without a shell, though I think the D-pad would be pretty miserable to use trying to get your thumb around to hit each direction individually. My examples here were printed out of ASA (essentially ABS) on my FDM printer at home, but I will say that if access to a 3D printer is an issue, having these controller parts printed out of Nylon by JLCPCB isn't unreasonbly expensive. Black shell, grey D-pad and buttons. 
|
|
|
|
|
|
|
|
This is awesome @leadedsolder and @keegs
I knew almost zero about the SG-1000 before I stumbled upon this. Since then, I've started looking around for info, podcasts and videos about this console. Keen to see further developments! |
|
|
|
|
|
|
|
Hi @leadedsolder , i recently bought a SK-1100 and returned playing with Sega's toys (sincerly i was thinking if i could port the SdCard multicart i made for Intellivision to SC-3000 SG-1000, but it seems not so easy as i thought).
I tested the keyboard and SF-7000 with SG-1000 and, as you wrote in your site, SF-7000 doesn't work with SG-1000. But it seems you found a nice workaround with some ORs ports, that i'd like to test. Have you already designed a SG-1000 to SF-7000 "adapter" i could build and test? |
|
|
|
|
|
|
|
I don't have an SF-7000, so I haven't tested even the change I made, unfortunately.
You could certainly make a little protoboard and add it to an SG-1000, if you can find room for the circuit. That Intellivision multicart sounds useful: I have a rusty/dirty Tandyvision One that I am slowly fixing and an ECS keyboard for it. |
|
|
|
|
|
|
Thank for your answer, i just asked if something already done before drawing a kicad proto from scratch. My multicards are on my github repository, and the Pico based one is obviously the cheaper and smarter : https://github.com/aotta/PiRTO I'm a bit stuck on porting it for SG-1000/SC-3000 becouse they need more GPIO (Intellivision CPU use same 16 bit for address & data!), and neither PICO nor Teensy has enough GPIO exposed. I could working on different board for SG-1000 and SC-3000, but i don't like such solution.... |
|
|
|
|