|
|
DevelopmentSega Master System / Mark III / Game Gear |
Home - Forums - Games - Scans - Maps - Cheats - Credits |
BIOS Removal
Introduction
The BIOS is stored in a chip, which is connected to a high priority enable signal, that makes it load at power up. The BIOS checks whether there's a game in the cartridge, card or expansion port, and loads it if (on a non-Japanese system) the checksum is correct. You may wish to remove the BIOS from your Master System to allow it to play some Japanese games which fail the header checks, or simply to speed up the boot process.
The high priority signal is connected to pin #20 of the BIOS chip. If you only want to disable the BIOS, just disconnect it. Cut the track, cut the pin... whatever you like. Maybe just disconnect the chip from 5V or GND. However, simply removing the chip will make the system unusable.
Process
Here's a simplified ASCII art version of the process:
 Before:                                 After:

 +-------------+                         +-------------+
 | I/O chip    |                         | I/O chip    |
 +-+---------+-+                         +-+---------+-+
   | Enable  | Enable                      | Enable  | Enable
   | BIOS    | cartridge                   | BIOS    X cartridge
   |         +--------+                    +---------+--------+
   |                  |                    X                  |
 +-+--------+     +---+------------+     +-+--------+     +---+------------+
 |   BIOS   |     | Cartridge port |     |   BIOS   |     | Cartridge port |
 +----------+     +----------------+     +----------+     +----------------+
The enable signal for the BIOS is cut, and redirected to the cartridge enable line, which itself is also cut.
Master System II

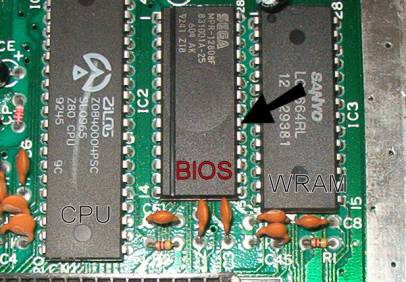
The BIOS chip is located next to the CPU as shown. To disable it, you can disconnect pin 20 (indicated by the arrow) - cut the pin or the trace leading to it. This is the /CE0 line, which is held low by the I/O chip to enable the BIOS.
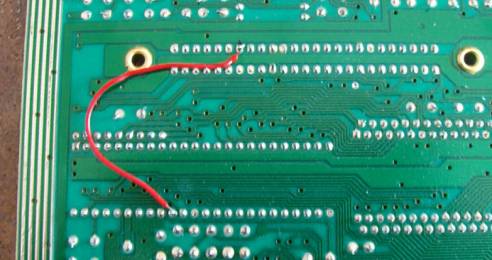
To make the system work, it is necessary to redirect this /CE0 line to the cartridge port so it will instead enable that. Just solder a wire from pin #39 (/CE0) of I/O chip, to pin #13 (/CE) on cartridge port, as shown below.

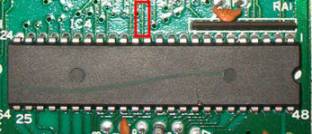
At the same time, you have to cut the /CE line that connects the I/O chip to the cartridge port pin #13, otherwise both /CE and /CE0 would be connected to same point, and the I/O chip would not be happy.

So, cut the trace shown to the right, which leads from the I/O chip to the cartridge port.
Master System 1
There are no pictures for this section. The process is very similar:
- Disconnect pin 20 of the BIOS chip.
- Cut the trace leading to pin 13 of the cartridge connector (and likewise the card connector and expansion port if you want to use them to play games).
- Solder a wire between pin 1 of the I/O chip (should be marked 315-5216) and pin 13 of the cartridge connector (and pin 13 of the card connector and expansion port if you want to use them to play games).
In this state, the card, cartridge and expansion port are all enabled at the same time, so the system will not work when more than one has media attached/inserted. The 3D glasses are not affected by this limitation, and will continue to work as before.
Problems
A few western-only SMS games may not work correctly after this modification, if they assume a BIOS is present or depend on its actions to work. Mark III/Japanese SMS software should work fine, as should SG-1000/OMV software.
References
- forum post by Mike G
- ConsolasParaSiempre english section by David Senabre (patroclus)
- Spanish original document by David Senabre (patroclus)

