|
|
ForumsSega Master System / Mark III / Game GearSG-1000 / SC-3000 / SF-7000 / OMV |
Home - Forums - Games - Scans - Maps - Cheats - Credits Music - Videos - Development - Hacks - Translations - Homebrew |
View topic - Sega Game Gear - Not working - Please help
 |
| Author | Message |
|---|---|
|
Sega Game Gear - Not working - Please help
|
|
Hi all,
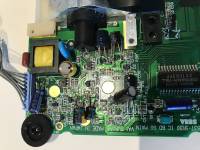
So I have bought a Sega Game Gear (Love Sega) with battery acid damage. I have cleaned it up and bought a capacitor replacement kit on eBay. Then replaced all capacitors on the main board and all on the power board except the 22uF one. (Did not have that one). Also the Powerboard is making a humming/buzzing sound, is that normal? This is what happens: With no cartridge in the contrast wheel works, but nothing comes on the screen (is this normal?) With cartridge in, the contrast wheel seems not to be working and no game is booting on the screen. Also it shuts down randomly 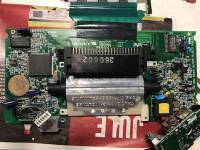
|
|
|
|
|
|
|
|
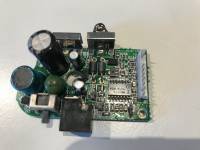
It sounds like you may have an intermittent short somewhere. Since the power board is humming, it's probably something gone bad on there.
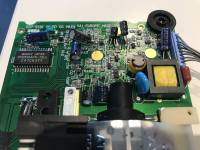
Where was the battery acid damage on the boards? I'm assuming the power board. Can you provide a picture of that board as well? Both top and bottom would be helpful. From the picture you've shown, it looks like c43 is too close to d4(the little 3 legged black surface mount thing.) Just a heads up, you'll possibly have issues closing the console back up with the way you have the caps installed. The copper pads on the board actually make contact with the back case, so they have to be left open for the case to close. Also, desolder those battery contact and soak it in vinegar for about 15-30 minutes if you can. Should eat the corrosion right off. |
|
|
|
|
|
|
|
Thank you for helping me YoshiKnuckles.
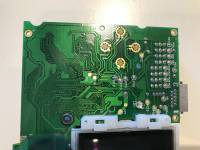
I have tried to take some better pictures, maybe you can see something that I don't see? I have also marked where the acid damage was on the main board. So the power board should be dead silent? I also want to say that before I changed all the capacitors on the main board it did also not work. If you want a Video or more Pictures please let me know. I really want to save this unit. 

|
|
|
|
|
|
|
| Help... ;-( | |
|
|
|
|
|
|
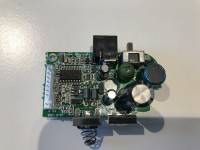
So I changed the external power supply and the noise is gone.
For me it looks like it is not booting the game but the game is in the GG. Here is a video: |
|
|
|
|
|
|
|
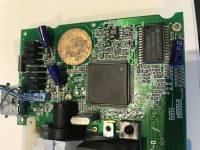
This might be silly, but has the game be cleaned recently? Dirty contacts on the game could be causing that. Just clean it with 90% or higher rubbing alcohol and a q-tip and let it dry for a few minutes before plugging it in.
From those pictures I can't see anything visibly wrong, and the fact that it powers up should mean the console is working. Unless there is a microscopic break in a trace in the acid damaged area, preventing a data signal from making it between the cartridge and Game Gear. That is impossible to tell without looking at it under a microscope or probing out all of the traces. I'm sure I mentioned it before, but the way you have the caps installed is going to prevent the case from closing. You'll want to rearrange them so they don't stick up or cover the exposed circular pads on the PCB. Unless you don't want it to fit back into its case... |
|
|
|
|
|
|
|
I promise to rearrange the caps if i get it to work! :-)
I have tried to clean the games and have confirmed that they work in another GG. I have also tried to clean the contacts in the GG but that was very hard? Could some of the pins be damaged or something there? I own a logic prope but have never used one. Also have a multi-meter. |
|
|
|
|
|
|
|
If the multimeter has a continuity mode and decently sharp probes, it will work.
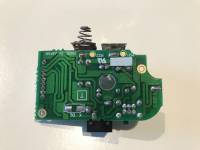
https://console5.com/techwiki/images/8/8b/Service_Manual_-_Game_Gear_VA1.pdf https://console5.com/techwiki/images/a/ae/Game_Gear_VA1_Schematic_-_Main_Circuit... Here's the service manual and schematic you probably want to focus on for the VA1. Since you've mentioned it had battery acid on it, start checking continuity of traces involving the Address, Data, and Control lines between the cartridge slot and the custom Sega asic that house the CPU, VDP, and a bunch of other stuff. Also check between it and the LCD panel. I know the pins are tiny, and the work is monotonous. If you have any sort of magnification, that might help here. The traces right next to R19 and R20 look like they may be broken. R20 definitely looks like it. Hard to tell because of the lighting/picture being fuzzy. Maybe start there? Those would be LCD driver control lines between the ASIC and the Chip on Glass packages on the LCD panel. There may be multiple breaks where the acid ate away at the copper of the PCB. |
|
|
|
|
|
|
|
I think you are right.. I checked R20 and R19 and they where both broken. I have fixed those but it still does not work.
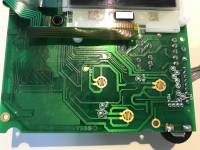
What is the best way to repair broken traces? I scraped in some of the line and added new soldering. Don't know if that is a good method? Also, I dont know if it is any help but there is no sound (have changed the caps) Here is a picture that i hope is better 
|
|
|
|
|
|
|
|
The way I usually repair broken traces is by adding mod wires to make whole new traces.
Basically just hook some 30 awg(maybe smaller?) wire up between the resistor and the IC. Realistically, those are signal traces, as long as they have continuity they should work. Note: Soldering to that IC can be difficult without a microscope and flux. Much better picture too! Could try replacing those resistors. They all look horrid. I believe the schematic specifies 220 ohm resistors? Any 0806 220 ohm resistor should do. It also looks like the far side(from the IC) of r17 is disconnected. You may also have some broken traces under the chip... Which is no fun to repair. You may be in for quite a lot of trace repair. |
|
|
|
|