|
|
MusicSega Master System / Mark III / Game Gear |
Home - Forums - Games - Scans - Maps - Cheats - Credits |
How To Make VGMs - Trimming
What you'll need
- VGMTool 2
- Winamp
- The VGM Winamp input plugin
- A wave editor which can load and show WAV files, zoom in, and tell you the exact position. I use Cool Edit 2000.
Write the VGM to a WAV
You need to install Winamp, and then the input plugin, but you probably already did that. Open Winamp, and press Ctrl+P to open the Preferences window. Choose Output from the Plug-ins branch, and select the Nullsoft Disk Writer plug-in. If you don't have it, you can get it from the Winamp website, but it should be included in all recent versions of Winamp.
Press the Configure button to choose where to create the file; note that it will be quite large, probably between 10 and 100MB depending on the recording length (it'll use 172KB per second, that's 10MB per minute of audio). Don't worry, you'll delete it in a minute.
Now close the preferences window, and load your VGM file (I like to drag-and-drop it onto Winamp's main window, but you could double-click it or use the Load button). It should play the file quickly, and you won't hear anything, because it's writing the audio to a WAV file instead. When it finishes, go back to the plugin window and choose the output plugin that you were using before (probably Nullsoft WaveOut Output or Nullsoft DirectSound Output), so you can listen to music again.
Hint: Make sure the Equaliser, and any DSP plugins you might have installed, are turned off. They will mess with the output, you don't want that.
Find the edit points
This is the slowest and most difficult part of the process. Open your newly-created WAV file in your wave editor, and zoom out fully. The music will be one of three types:
- A single non-looping track, eg. Alex Kidd title screen music:

- Stuff before the music starts
- The music you want
- Stuff after it finishes
- A simple loop, where when the music finishes it goes back to the start, eg. Alex Kidd in Miracle World level 1:

- Stuff before the music starts
- The music you want
- The same music repeated
- The same music repeated again
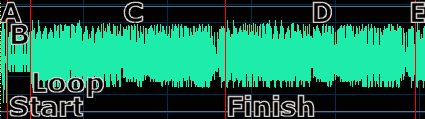
- An introduction, which leads in to a looping section, eg. Wonder Boy III "The Monster's Lair"
- Stuff before the music starts
- Introduction
- Looped section
- The looped section repeated
- The looped section repeated again
You should know which type you have from listening to it as you recorded it. You might need to listen to the wave file to find approximately where the dividing lines between the parts are, though, especially if there is not much volume variation in the track as then the wave will look like a solid block all the way through. Make sure you don't mistake short repeated parts for the whole repeated part - that's why you should always log more than you think you need.
You need to find the exact position of two or three dividing lines between sections:
- The Start - everything before this will be discarded
- The Finish - everything after this will be discarded
- The Loop point - the start of the looped section. Type I doesn't have a Loop point, and for Type II it's the same as the Start point.
VGMTool will use these to cut the VGM file. You'll have to use your wave editor's zoom functions to be precise, although you don't have to be sample-precise - the best way is to play the wave from various positions and use the sound to tell if you've got the position right or not. 100 samples either way will probably not make any perceptible difference, although if the output sounds wrong, try changing the edit points slightly.
You need to find out the sample number for these points; if your wave editor can't display that, you can multiply the precise position in seconds (with decimal places) by 44100, eg. 8.600s × 44100 = 379260 samples.
Here's the edit points I used for the Type III wave above:
Start:

Loop:

Finish:

The best way to tell if you've got the loop and end points in the right place is to play the wave from both points, and listening to see if they sound exactly the same (because it's normal for the waveforms not to be identical); Cool Edit 2000's Cue List is useful for this.
Here are the edit points for all the example VGMs available to download above, so you can create the WAVs and see for yourself:
| Type | Start | Loop | Finish |
|---|---|---|---|
| Type I | 85257 | n/a | 260928 |
| Type II | 171246 | 171246 | 1299478 |
| Type III | 97014 | 379253 | 2637178 |
When finding these numbers for your own VGMs, write these numbers down (or enter them in VGMTool) as you go.
Hint: While you don't have to be absolutely precise, you may have minor sound problems, often with the PSG noise channel, if you choose a point after the exact position, so try to get as close as you can without going past it.
Trim the VGM
Load VGMTool 2, and drag-and-drop your VGM file onto it. Go to the Trim/optimise tab and enter the edit points you found in the Trimming groupbox. If you want the file to include looping (ie. if it's Type II or Type III), check the Include looping box. Then click on Trim to create a new file in the same folder as the original VGM; the program will tell you the filename, but it should be easy to find.
What's that "Round times" button?
If the file was logged as frame-accurate using Meka then the exact correct edit points are multiples of 735 (for a 60Hz emulated system, 44100 � 60 = 735) or 882 (for 50Hz). If the file has its Playback rate included in the Header, this button will do the rounding for you. The rounded times should be close to the times you found; for the example Type III above, the rounded times (shown in the screenshot above) are only 6, 7 and 2 samples out respectively. You should check these rounded times in your wave editor, to see where they actually are; if they are not right, don't use them!
You should listen to the output file in Winamp to check that it sounds right, particularly around the edit points (start, loop, finish). If it doesn't, go back and check the edit points again. If it does... well done!
< Logging | How To Make VGMs | Tagging >
